August 09, 2006
I'm going to start small. I'm going to build a little box for plants this weekend. If I manage to finish the project and still have all 10 fingers, I'm going to try to make a desk, an end table, maybe a sort of trunk/bench that I can put stuff in. Does anyone have any advice to someone who is relatively new to this? Things like, what materials are best, how do you attach them, where can you get them for cheap, etc. I read the MAKE blog and the instructibles site but they don't really help me get started at a basic level. For example, where can I get smallish bits of wood to build my plant box? Will I have to buy a big sheet of plywood from someplace like Lowes and cut what I want from it? (I'll also accept any tips on how to not eviscerate myself with a jig saw.)
-
Lots of hardware stores* have bins for selling offcuts. Rummage around in one of those (be careful of splinters!) for some matching bits to start to play with. * at least in the countries I have lived in* * Australia and Japan
-
Measure twice, cut once.
-
The as-is at Ikea also has a lot of good boards available cheap. If you're anywhere near an Ikea, obv. (But plywood? For a plant box? Dude, you're going to have water going through there, and plywood or particle is going to swell and warp. Go for regular softwood, and it'll last a lot longer.) Don't be afraid to get right in there, and dick around a lot. The improvement rate is pretty steep, so your second and third pieces are going to be much, much better than your first. Most importantly, though -- and it's a cliche because it's true -- measure twice, cut once. Good luck!
-
Or what ladyknight just said, far more succinctly.
-
When you accidently hit your thumb with a hammer, put a nickel in the Swear Jar! Oh, and don't let the measuring tape sproing back too quickly into the metal tape holder because if your hand is still in the way, man does that hurt!
-
If you do a Google search, you're certain to find all kinds of do-it-yerdamnedself guides on simple home carpentry. If you're going to get serious about it, though, you might want to purchase some woodworking machines for your personal use.
-
You should build your plant box out of exterior grade plywood. You should line the box with aluminum or galvanized flashing. You should consider drain holes. Make neat joints. Pilot drill the nail holes, and consider using screws, instead. For really good fasteners, consider stainless steel or brass. Take 3 times longer than you thought you would. Paint or seal that project. Write your name and the date in some inside spot. Use sharp tools. Use ear plugs with loud saws, drills, and sanders. Strut modestly when done.
-
Also, clamp down a scrap of straight wood, to serve as a saw guide. Clamp your project down when sawing. Place a bit of cardboard or wood between the clamp and your project to protect it.
-
Have respect for the power tools, but don't be afraid of them. When you're afraid, you tend to cut too slowly which makes burn marks and increases the likelihood of binding and kickback, which are both bad things. If you don't have a proper setup for cutting full sheets of plywood, have the lumber yard cut it for you (either to your finished size, or into more manageable pieces).
-
In college, I made a desk out of scrap wood, screws, and my trusty Swiss Army knife (it had a very sharp wood saw). And some paint.
-
And if shop class has taught me anything -- TAKE THE CHUCK KEY OUT OF THE DRILL BEFORE YOU TURN IT ON.
-
Yes, wood is better than plywood for something that's going to get wet - even outdoor grade plywood won't hold up so well. Avoid treated wood for your plant box because it may be toxic to plants, and if someday ye wish to stick a couple of peppers or a tomato into the box, ye can eat the fruit without poisoning yourself or your guests. Redwood is probably best for patio/deck tubs and furniture, because it's long-lasting, not very attractive to bugs, and highly resistant to rot. smallish bear, most large building supply places and many lumberyards will precut wood for you if you know the measurements ye need beforehand. Look for plans with square-cut wooden pieces unless ye wish to invest in gadgetry like a router, table saws and so forth, (all of which is overkill and unnecessary expense for simple constructions if ye don't already own them). One labour-saving tool I use frequently /find indespensible is an electric drill, with a quarter-inch or half-inch chuck. You can get attachments for these to use with screws, mix paint, and so on that come in handy for other projects. However, simple construction projects can be done using only hand tools. A miter box is useful for making angled cuts.
-
Thanks everyone for all the good advice. I've already got a drill like you describe bees, and a good saw and mitre box are on my list of things to buy, rather than a table saw or skill saw. Thoughts on wood selection are especially helpful, since I'll be growing herbs to eat and hope to avoid death.
-
Never use tools that came from the dollar store. Use the Pentagon-quality $60,000 hammers for best results.
-
if you're happy to work in somewhat restricted dimensions (or do a lot of cutting), wood that's intended for shelving can be quite useful. if using a jigsaw, make sure your wood is firmly in place. as rocket says, don't be hesitant on your cut; keep a smooth even pressure. position your body to the side of the saw's route. i usually cut over and then sand.
-
One option for wood is to get hold of the treated pine they make shipping pallets (the flat wooden bases that fit on a forklift -- I don't know what they're called elsewhere). I'd be inclined to build a planter box that you can stick potted plants inside, still in their pots. My brother-in-law built a wooden box to fit around an old laundry sink, which you couldn't see once it was filled with soil and plants, and had the plughole in the bottom for drainage.
-
You could use marine grade plywood, but cedar is a better idea it's really good for outdoors and plants, in other words, what bees said. If you want the corners of the box to look pretty, bevel them to 45° and join them (this would require the mitre box bees was talking about and, coincidentally, is called a mitre joint). This may cause some problems in conceptualizing a joining medium and I'd suggest screws, lemme draw a pic:
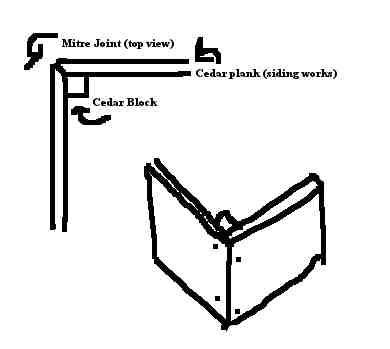 Notice how the screws are staggered? You don't want the wood to be split apart by too much activity stressing one area. Countersinking the screw-holes might be a good idea if you have a small, screw sized piece of doweling to stick in there and cut off to keep it looking pretty.
Otherwise you could butt-join it (see the picture? pretend the bevels aren't there and one of the pieces carries straight through flush to the side of the other piece) and it'll still look rustic enough. If you butt-join you won't need to use as many screws (just one side—screw lengthwise into the cut end), but if you give it a miter-joint you might need to pick screws that aren't too long.
If you're going to countersink the screws so that you can dowel over them, make sure that the wood is thick enough so that you will still maintain structural integrity. Otherwise use self countersinking screws, screw them in more or less flush with the wood and paint over them.
The bottom of the box would be done best with a router and a dado joint (you can also do this with a steady hand and a hand-saw and chisel). If you do go this route, I suggest you use the miter-joint for the corners, because in the finished product it will disguise the dado joint used for the bottom and cause less problems with out of place gaps in the long run (assuming you don't have or need a router). Easier than conceptualizing exactly how you would go about this is just making another butt-joint.
That's just a box tho'. I'd try and make something so that the blocks I was using to screw my miter joints to came out the bottom a little as legs if it were a smaller box meant for a patio. If it were a larger box, I would use a screwing block on the inside corner as well as a reinforcing frame regardless of whether I was doing a butt join or a miter join just to ensure structural integrity. I guess in the end it all depends on where you are going to put it.
Don't bother with glue for outdoor joinery, just use it on the desk. Remember, the secret to strength is 90°, every step beyond will sacrifice durability, so accommodate. When making the desk, cam-locks are your fastener friend, they will let you be able to take it apart and put it back together in case you have to move it.
Notice how the screws are staggered? You don't want the wood to be split apart by too much activity stressing one area. Countersinking the screw-holes might be a good idea if you have a small, screw sized piece of doweling to stick in there and cut off to keep it looking pretty.
Otherwise you could butt-join it (see the picture? pretend the bevels aren't there and one of the pieces carries straight through flush to the side of the other piece) and it'll still look rustic enough. If you butt-join you won't need to use as many screws (just one side—screw lengthwise into the cut end), but if you give it a miter-joint you might need to pick screws that aren't too long.
If you're going to countersink the screws so that you can dowel over them, make sure that the wood is thick enough so that you will still maintain structural integrity. Otherwise use self countersinking screws, screw them in more or less flush with the wood and paint over them.
The bottom of the box would be done best with a router and a dado joint (you can also do this with a steady hand and a hand-saw and chisel). If you do go this route, I suggest you use the miter-joint for the corners, because in the finished product it will disguise the dado joint used for the bottom and cause less problems with out of place gaps in the long run (assuming you don't have or need a router). Easier than conceptualizing exactly how you would go about this is just making another butt-joint.
That's just a box tho'. I'd try and make something so that the blocks I was using to screw my miter joints to came out the bottom a little as legs if it were a smaller box meant for a patio. If it were a larger box, I would use a screwing block on the inside corner as well as a reinforcing frame regardless of whether I was doing a butt join or a miter join just to ensure structural integrity. I guess in the end it all depends on where you are going to put it.
Don't bother with glue for outdoor joinery, just use it on the desk. Remember, the secret to strength is 90°, every step beyond will sacrifice durability, so accommodate. When making the desk, cam-locks are your fastener friend, they will let you be able to take it apart and put it back together in case you have to move it.
-
Never use tools that came from the dollar store. I'd say, "learn what tools you can buy at the dollar store." Oh, and most importantly of all: don't force tools! Tools make work easier! Let the tool do most of the work. Don't lean on your saw or it'll bind and curve your cut. Don't choke your hammer or you'll lose all the leverage and swing twice aas hard or twice as much, grasp it from the heel and learn to aim that way. And don't put pressure on your screwgun, it's screwing, not you; just make sure it's perpendicular to the plane and follow it in.
-
Yes, the Chimpy speaks good advice about the dollar store. I've picked up Stanley tools--tape measure, pliers, screwdrivers--for a buck, and my husband immediately scarfs them. He's a bit of a tool freak, so he won't put "crap" in his tool box. (He won't put it in his tool box if I spray it pink first, either) Some stuff isn't worth getting--DON'T bother with the dykes, the rtv gun, or the handsaw, but the small hammer is great for putting together picture frames or using tiny nails in tiny projects. I bought a rubber mallet that Mr. BlueHorse stole for making "adjustments" on wood projects without denting or scratching surfaces. One of the greatest items we picked up was a jeweler's magnifying glass stand--has all these little claws and gadgets surrounding a magnifying glass mounted on a heavy metal base. Great for small projects that you need to have a third or fourth hand for. There's a buncha good deals--chalk for chalk lines, non-linting stain rags, various grade sandpaper, throwaway brushes for paint and stain, funnels for pouring liquids, disposable plastic containers or containers with lids, etc. Might save you something to put toward a table saw.
-
My favorite (and most-used) items in my wood shop are, in order: Makita cordless drill/driver, with two rechargeable batteries (and charger, of course). I've built two large decks with that sucka, and use it all the time. DeWalt compound mitre saw. That baby can breeze through 4x4's. I love it. 12" belt saw/sander. I rarely use the sander belt, but that damn saw is used way more than it should be, the best way to cut something quick, clean, and with little loss. 10x better than any jigsaw. Table saw and table router. These two guys are powerful, useful, and must-haves for any serious woodworker, but I use them with a large degree of respect. Mistakes here lose fingers and eyes. And having said that, get a good pair of comfortable safety goggles, and wear them at all times when you are in the shop. Leave them by the door, and just put them on as you enter as a matter of habit. Seeing is a good thing.
-
Consider getting a good woodworking book. Carpenters have lots of shortcuts that you won't work out for yourself and a good book can teach you some of them. Things like framing squares and scribing tools come to mind as clever ways to solve otherwise annoying problems. A book will also teach you thinks like which way wood swells most when wet (lengthwise), why this is important (so your project doesn't split), and how to deal with this problem (always keep boards that are attached together in the same direction or use fasteners or joinery that allows them to slip). You can only learn this kind of thing from a book or from an experienced woodworker and it will save you loads of time when you get to more complicated projects. Plus good woodworking books have lots of cool pictures.
-
Just, whatever you do, DO NOT WATCH Norm Abram on US public television. Norm Abram is evil. Norm Abram is Satan. Norm Abram will make a gorgeous roll-top desk in 24 minutes and make you think you can do that, too. Norm Abram has every tool that I rightfully should have if this were a just world and there were actually a God. Norm Abram has a jig that will allow your table saw to create a working banjo out of an edge-glued sheet of hickory with one cut. Norm Abram does not measure at all, cuts once, and has the perfect piece with no waste. Norm Abram impregnated your sister.
-
Clamps. Lots of clamps.
-
If you've the tendency to go into acquisitive hysterics when watching Norm Abrams do not under any circumstances, order a catalog from these guys: Lee Valley Tools.
-
SFRED IS RIGHT! There's a Lee Valley STORE about 90 minutes from my home, and my wallet is sad to say I've been there three times. For tool junkies, it is the (insert incredibly addictive drug of choice here) of tooldom.
-
mitre /not a spelling bee!
-
Norm Abram has a jig that will allow your table saw to create a working banjo out of an edge-glued sheet of hickory with one cut. I've actually gotten very angry watching Nahm in his shop. Some of those tools, I feel like the fucker's cheating. Not everyone has a hundred grand to drop on a woodshop. There are tons of good books on basic woodworking skills. I've got a great one at home, have to check the title, but it's mostly about how to make good corner joints -- butt joints, miter joints, etc., which, until you buy a lathe, is roughly 80% of woodworking.
-
The man wanted to build a box for flowers. We may have scared him away forever, with all of our advice.
-
Can't really add much that isn't already here, except I would recommend you don't eviscerate yourself with a jigsaw. It's difficult to keep a straight line with one of those, so I would stick with a circular saw for that. An X-acto would be better for smaller stuff, like eyes.
-
I watched an episode of This Old House where the project house was close to Norm's house, so they took the homeowner over to Norm's shop to work on something. The homeowner walked into the shop wearing a blindford, and Norm made a comment about him not being able to find the place again.
-
Take some basic woodworking, metalworking, welding, or electronic repair classes at the local community college. You can learn so much from taking these classes that it will really increase the amount of things you can do. It helps especially well to work on projects for which you don't have the tools. A good lathe can help you create some amazing things.
-
Instead of just using a piece of wood for straight cuts, use a length of MDF, it doesn't have the warp that plain wood has. Get yourself a speed square. Watch this old house hour. Every weekend.
-
*applause for Insolent chimp*
-
DON'T bother with the dykes Please stick to the subject.
-
Bees: not to worry 'bout the spelling: mitre is listed in dictionary.com as being a chiefly British spelling. Us'uns in the USA use miter If our poster is a Catholic sort of Bear, he might want to build his own miter box
-
Not only that, GramMa, but a lot of tradesmen traditionally weren't that literate and they ended up writing books or changing spellings for the apprentices who came after. Take Bowline aka Bowlen for example, phonetic spellings are everywhere in the trades.